Snow day today so I worked from home, then spent some time researching for inspiration and doing some crafty stuff. I have taken the momentum I've been feeling lately and pulled the Glencroft out of the bedroom and continued with the shingling. I didn't get too terribly far, but I made progress. I want to get this part DONE so I can decorate the house and display it. (And to move on to other things, too!)
I also set up another scene in the roombox which was a lot of fun. Here are some pics. :)
About this blog:
Thursday, March 1, 2012
Wednesday, February 29, 2012
Tuesday, February 28, 2012
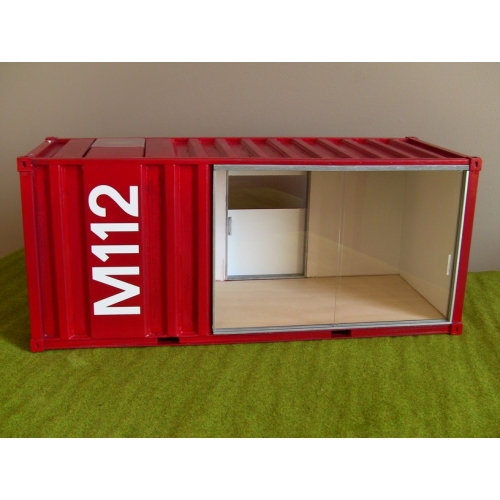
Mini shipping containers for modern houses!
Wow! I saw these mentioned on the Small Stuff mailing list today and I fell in love!
They are 1:12 scale shipping containers you can use to make a modern dollhouse. The company that makes these, PRD Miniatures, has a lot of modern mini furniture! So much eye candy to add to my wish list! :)
Monday, February 27, 2012
Room box = light box?
My goal for an unspecified amount of time (ha!) is to post everyday about something in this blog. It keeps me on my toes. Let's see how long it lasts.
So today I pulled out the small room box kit I bought from the RGT Outlet Sale sometime last fall. It's one of these: http://www.realgoodtoys.com/store/productview/110938//QuickBuild_Small_Display_Box
I was playing around with the construction and put it together without glue and realized that it would make a great light box for photographing minis and crafts! If you leave the "ceiling" off or replace the sides with columns and thin tissue paper, you could really replicate some of the ones found on this quickie Google image search.
I had no real plans for this roombox, except I didn't want to pass up the bargain, so I snatched it. Jason bought an extra small version and I am looking forward to see what he'll do with his. :)
Here's a pic I took tonight:
I can just picture different kinds of flooring and wallpaper for each scene in here, can't you? :)
So today I pulled out the small room box kit I bought from the RGT Outlet Sale sometime last fall. It's one of these: http://www.realgoodtoys.com/store/productview/110938//QuickBuild_Small_Display_Box
I was playing around with the construction and put it together without glue and realized that it would make a great light box for photographing minis and crafts! If you leave the "ceiling" off or replace the sides with columns and thin tissue paper, you could really replicate some of the ones found on this quickie Google image search.
I had no real plans for this roombox, except I didn't want to pass up the bargain, so I snatched it. Jason bought an extra small version and I am looking forward to see what he'll do with his. :)
Here's a pic I took tonight:
I can just picture different kinds of flooring and wallpaper for each scene in here, can't you? :)
Sunday, February 26, 2012
I finished the birdhouse!
I finished the landscaping, too. :) Here are some pictures:
I would love to make more! This was a lot of fun to put together. :-D
GIVEAWAY WINNER ANNOUNCEMENT!
I had the pleasure of choosing the winner of my (1st ever) blog giveaway today! First of all, I want to say I am SO EXCITED about the response from this and I want to welcome all of the new followers of my blog since the announcement of this giveaway! I plan to do more giveaways in the future, so keep watching. :) And I hope you like what you see. :)
Anyway, I had 41 different commenters on the Giveaway blog post, so I listed them in Excel. Then I used random.org to choose the winner. Let's see who I (or rather, random.org) picked. :)
So congratulations to Doortje!
You are the winner of my first blog giveaway! I have sent you an email, so please contact me there with your address and I will send out your prize as soon as possible!
Again congratulations, Doortje and THANK YOU to everyone who participated.
Birdhouse and more landscaping goodies.
So, Jay and I stayed over in NH last night so I could do some sampling for my marine biology research. And BOY was it ever windy!!! I was soaked after that adventure. But what made up for it was stopping at Earth N Tree on the way back to NY. :) I love that place! I had a bit of an agenda while there so I didn't spend as much time wandering about aimlessly looking at every little thing! On the trip back home, I saw a field of birdhouse motels in western NH, which inspired me to design and build one for the herb shop yard. And tonight, that's what I did!
So I've never done anything like this before, and I played it by ear. I researched birdhouse motels online to get some ideas and basic measurements and then opened up my giant Ziploc bag of scrapwood. I found two nice size rectangle pieces and cut the side pieces to fit. For the roof, I cut strips of wood to fit and laid them across. Here's a pic to show the unfinished, unshingled product:
I shingled it with some leftover asphalt shingles that I had used on the smaller roof on the herb shop (they match!). I also glued on the pole (which is still a little wobbly and really needs to dry overnight). As you can see in the pic below, I still have some paint touchups to do (on the pole and the holes). In addition, I want to build a base with clay (over which I will glue coffee grounds for soil) that I can attach with Tacky Wax to the base of my scene.
You can see two of the little treats I bought for myself in the background - a log filled with mushrooms and a tiny brass mailbox. :) I also bought a trellis with lovely plants which I attached to the side of the shop. I also plant to fill some window boxes with handmade roses (from a kit I bought today!).
So I've never done anything like this before, and I played it by ear. I researched birdhouse motels online to get some ideas and basic measurements and then opened up my giant Ziploc bag of scrapwood. I found two nice size rectangle pieces and cut the side pieces to fit. For the roof, I cut strips of wood to fit and laid them across. Here's a pic to show the unfinished, unshingled product:
I made the holes first with a thumbtack and then widened them with my pointy clay tool (can't remember what it's called!).
Once that glue dried, I painted the entire thing with Tim Holtz "Picket Fence" Crackle Paint (which I love!!!) to give it that weathered, outdoor look.
You can see two of the little treats I bought for myself in the background - a log filled with mushrooms and a tiny brass mailbox. :) I also bought a trellis with lovely plants which I attached to the side of the shop. I also plant to fill some window boxes with handmade roses (from a kit I bought today!).
Labels:
bird house,
crackle paint,
crafts,
herb shop,
landscaping
Subscribe to:
Posts (Atom)