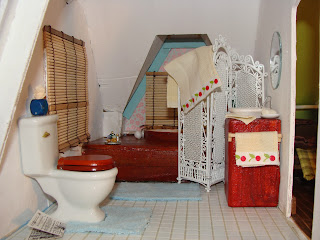
So I took today to work on some finer details. I am going to go room by room as I do this (to focus my energy on one thing at a time and to not distract myself too much!). So today I worked on the bathroom. Here's what it looks like now:
You can compare this with my post from a couple days ago here.
Highlights include: new sink, repainted bathtub, new bath mats, towels, and a new screen.
First, the sink:
How I did it:
Well, I wanted a modern sink that matched the bathtub that I also made (with a Japanese flair), so I looked through my stash to see what I had. Luckily, I had been to a Tuesday Morning recently and grabbed one of these Tim Holtz Configurations boxes (for $4.99!). As you can see, it's one big box with a bunch of little boxes inside that you can use for multimedia projects. I wrapped one of those smaller boxes (that had just the right dimensions for a sink - these are lovely "to scale" pieces) in masking tape. Then I painted it in an acrylic color called "Transparent Red Oxide" which gives that great reddish tint. I had done the same to the bathtub too.
I poked a hole close to the open side of the box to fit a bent paper clip through for the faucet. The bowl of the sink is a wooden mini bowl painted with white acrylic and glossed with varnish until it shines. The "drain" is a piece of brass metal tape that I cut out with a hole punch. I drew in the lines around the drain with an artist marker. As you can see the open side of the box is against the wall. If you wanted, you could add a door or shelves and leave that part exposed. Perhaps even a little curtain across the front could work too, depending on your decor style.
I also added a little towel bar on the side, too. :)
As you can see I did make some towels for the bathroom. I had some linen napkins in my stash that I had found at an antique store and cut one into the correct dimensions for a towel, hand towel and washcloth. I edged the bath and hand towels with some cute ribbon I had on hand.
I also made a bath mat and toilet rug:
Those were simple as I cut up an old kitchen towel we had, but no longer use. It gave that "shaggy" texture that, to me at least, seems right to scale.
Also, as you can see above, I replaced the Asian screen with a lighter, smaller screen that fits in well. I loved the other one, but with the sink installed, it didn't fit in the room. I will definitely be using it in another room or another project.
And, yes, I finally gave this house a door! :) You can see the results below - indoors and out. :)
(PS: I am sorry I didn't post pictures of the sink as I went. :) I really wasn't sure how it was going to turn out. But if anyone is interested, perhaps I could make a photo/video tutorial.)


Molto carino, con tanti bei dettagli!
ReplyDeleteThe bathroom looks great! The red sink and bathroom add just the right touch of color.
ReplyDeleteCheers,
Iris
Really FANTASTIC...!!!
ReplyDeleteThe colour combination is so good..
Kind regards
jaice
The bathroom is beautiful. I like the sink.
ReplyDeleteBye Faby
Looks great! I get the sense of the Japanese influence too... I wish my bathroom were that nice!
ReplyDeleteTe ha quedado un baño fantastico, me encantan los colores que has elegido.
ReplyDeletebesitos ascension
Thank you for visiting my blog and joining the giveaway! Love your Glencroft project! Cheers, Sanne
ReplyDelete